CSC 212: Programming with Data Structures
Lab 3: GUI Events and Layout
Due: Thursday, Feb. 11, 11:59pm
This lab will introduce you to various forms of event handlers in Java, and also cover a little bit of component layout. Before you begin, familiarize yourself with BullsEyeGUI.java. At the moment, this doesn't do anything active, but we will be adding behavior throughout the lab. You should also review JBullsEye.java, which is a subclass of JComponent that draws a bull's eye shape consisting of concentric circles of color. In particular, note the cycle() and invert() methods, which modify the colors in the bull's eye, and which we will soon associate with the appropriate buttons.
Button Events
The first thing we will do with our GUI is activate the buttons. This text will go through the activation of the Cycle button step by step. Then you will take similar steps to activate the Invert button.
We need to add an event listener with a method that will be called when the Cycle button is pressed. This event listener must be a class that implements the ActionListener interface. The only requirement for ActionListener is the includion of an actionPerformed() method.
Sometimes you will see programs where the GUI class itself does double duty as a listener -- i.e., it implements ActionListener, and has an actionPerformed() method. This approach runs into problems when there are multiple buttons: each button will end up activating the same actionPerformed() method. At the same time, it usually doesn't make sense to implement a completely separate class file to handle GUI events, since this class only makes sense within the context of the GUI.
A nice solution is to use private nested classes -- typically short utility classes that are defined within the BullsEyeGUI class and can therefore access all of its members. Here is the definition of a nested event listener class for the Cycle button:
/** Event handler for Cycle button */
private class CycleListener implements ActionListener {

    /**
     *  Cycles the colors when the button is pushed.
     *  @param e  Holds information about the button-push event
     */
    public void actionPerformed(ActionEvent e) {
        bullseye.cycle(); // note reference to enclosing class's private field
    }
}
Put the above code inside BullsEyeGUI.java but at the end, after all the other methods (including main), but before the last curly brace that completes the class. We also need to do one more thing before our button will function: the button must be told about the listener we have created, so it can activate the actionPerformed() method whenever the user clicks. The following code goes inside createComponents() right after the button has been added to the pane:
cycleButton.addActionListener(new CycleListener());
Once you've added this code, test it out to make sure it works! You should be able to press the Cycle button and have the colors cycle. You should try to run the program as both a Java Application and a Java applet (Eclipse can do both).
Now write the Invert button handler in a similar fashion and make sure that works too.
Animation and Timers
It is not hard to add simple animations to your GUI programs using events and the Java Swing Timer class. The basic idea is that we will create a Timer instance, which will cause an event to fire either once or repeatedly at some specified interval. The Timer starts in an inactive state, and thereafter its behavior is controlled by calls to its start() and stop() methods.
Because the Timer will be used in several places within the GUI class, it should be a class field. We will also establish a numeric constant specifying how often the Timer should fire (in thousandths of a second).
/** Used for animation of the bull's eye colors */
private Timer timer;

/** Time between updates is half a second */
private static final int TIMER_INTERVAL = 500;
There are several Timer classes in Java, make sure to import the Timer from javax.swing:
import javax.swing.Timer;
We will need to create the Timer object and assign it to our new field. It makes sense to do so in the BullsEyeGUI constructor:
this.timer = new Timer(TIMER_INTERVAL, new CycleListener());
Note that, as shown above, creation of a Timer takes as arguments the firing interval in milliseconds and an appropriate ActionListener object. So in this case, once the Timer is started, it will call the action associated with CycleListener every half-second.
We have now created a timer, but since it begins in the inactive state and we have no way to turn it on, it isn't much use yet. Add two more buttons in createComponents(), Start and Stop to the layout. Then create two more private classes that implement the ActionListener interface. The event handlers for these should call timer.start() and timer.stop(), respectively.
Mouse Events
Another useful event type is the MouseEvent. A basic mouse handler will implement the MouseListener interface, which is somewhat more complicated than ActionListener. MouseListener requires implementation of five different methods: mouseClicked(), mousePressed(), mouseReleased(), mouseEntered(), and mouseExited(). Not all of these need to do anything, but they must all be defined, possibly with empty bodies. (To make this easier, Java provides a predefined class called MouseAdapter that has all five empty methods already in place. You can create a class that inherits from MouseAdapter, and then simply override with new definitions any methods you want active.)
To see how a MouseListener works, add one to the bull's eye component:
this.bullseye.addMouseListener(new SampleMouseListener());
Then add SampleMouseListener as another nested class inside the GUI class:
/** Mouse event handlers */
private class SampleMouseListener extends MouseAdapter {

    /** Click event handler prints a message with the event location */
    public void mouseClicked(MouseEvent e) {
    	System.out.println("Click event at ("+e.getX()+","+e.getY()+")");
    }

    /** Press event handler prints a message with the event location */
    public void mousePressed(MouseEvent e) {
    	System.out.println("Press event at ("+e.getX()+","+e.getY()+")");
    }

    /** Release event handler prints a message with the event location */
    public void mouseReleased(MouseEvent e) {
    	System.out.println("Release event at ("+e.getX()+","+e.getY()+")");
    }

    /** Enter event handler prints a message with the event location */
    public void mouseEntered(MouseEvent e) {
    	System.out.println("Enter event at ("+e.getX()+","+e.getY()+")");
    }

    /** Exit event handler prints a message with the event location */
    public void mouseExited(MouseEvent e) {
    	System.out.println("Exit event at ("+e.getX()+","+e.getY()+")");
    }
}
Now play with the mouse on top of the bull's eye to see what kind of events you can generate!
Java also defines MouseMotionListener and MouseWheelListener interfaces for responding to drag events and scroll wheel events, respectively. The MouseAdapter class also implements these interfaces and provides empty event handlers for them. Let's override some of those empty handlers with ones that provide information analogous to the five handlers already written. If you look at the MouseMotionListener interface, you will see that it promises handlers called mouseMoved() and mouseDragged().
Go ahead and write these in your SampleMouseListener class, making them print the mouse location just like the other handlers. Now, before you can see them in action, you'll also have to register the listener using the appropriate JComponent's addMouseMotionListener() method. Do this in createComponents(), right below the line that adds the mouse listener. (Even though the same class is handling both types of mouse events, it needs to be added as a listener twice, once for each kind.)
Make sure you see these two types of events (move and drag) printing as well!
A more typical mouse handler might use the coordinates of the mouse event to trigger some state change in the component where the event occurred. As an example, clicking twice in the bull's eye might cause two colors to be swapped. To accomplish this feat, you will need to make a the following changes. (Try to do this without looking at the help first, then check your solution.)
- Add a method to JBullsEye that computes the index of the ring from (x,y) coordinates. The outer ring is index 0. [help]
- Add another method to JBullsEye that swaps the colors in two rings specified by their indices. [help]
- Add an int field named ring to BullsEyeGUI to keep track of the first ring clicked. (This is what is referred to as a state variable, because it records the current state or recent history of the GUI.) If the user has not clicked on a ring, its value will be -1, so set ring to -1 to start.
- Modify the mouseClicked() event handler so that it checks the value of ring
and performs the appropriate action. [help]
- If ring == -1, store the ringIdx() of the current mouse click instead.
- Otherwise, swapColors() between the index stored in ring and the ringIdx() of the current mouse click, and set ring back to -1.
Layout
Our example so far has used a FlowLayout manager, which arranges the components like the words on a page of text. Sometimes a simple layout manager like FlowLayout cannot give you the flexibility you need to create an attractive GUI. One way to gain more flexibility is to use panels to group and arrange elements. A panel acts as a single component in terms of the layout it fits into. At the same time, it can contain multiple elements in a layout different from that of the parent pane.
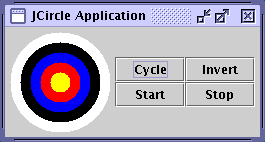
The image above shows the four buttons grouped into a panel that uses a 2x2 GridLayout. To accomplish this, we must create a panel element and insert the buttons into it instead of the top-level pane:
JPanel panel = new JPanel();
panel.setLayout(new GridLayout(2,2));

...
panel.add(cycleButton);
...
panel.add(invertButton);
...
panel.add(startButton);
...
panel.add(stopButton);

pane.add(panel);
TODO (optional): Modify the button panel so that it looks like the image below:
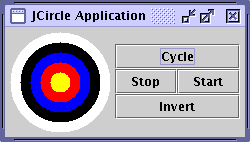
You will need to use a BorderLayout, and insert the button elements into the BorderLayout.NORTH, BorderLayout.SOUTH, BorderLayout.EAST, and BorderLayout.WEST positions. Here's an example using the first button:
panel.add(cycleButton,BorderLayout.NORTH);
To Submit
- JBullsEye.java with all changes
- BullsEyeGUI.java with all changes
- typescript showing compilation on the server (no screenshot is required for this lab)
If you have more time, you may begin work on Homework 3.