CSC 212: Programming with Data Structures
Lab 2: Classes with Graphics
Due: Thursday, Feb. 4, 11:59pm
This lab will give you practice with four things:
- Writing classes in Java, with appropriate constructors,
accessors, and manipulators
- Classes with inheritance
- Basics of window graphics
- Using Javadocs
This will help to prepare you for the next homework assignment, which is also graphics-based and requires you to write several classes from scratch.
Starting Point
Because this lab uses classes that display themselves, you will get immediate visual feedback about how your code is functioning. However, the detailed setup for a graphical program is somewhat complex and not particularly relevant to the goals above. Therefore we are starting you off with a working program that prepares the window environment before displaying a series of objects: CircleApp.java. You will not have to modify this program at all, except to add commands to display the additional objects that you will create. For this lab, it is not necessary to understand exactly what is happening in the prewritten code. We will cover this material at a later time.
You will also be provided with two example classes, JCircle and JColorCircle. Both are subclasses of JComponent, which makes them suitable for display in a window environment. JCircle has a single field diameter that describes the size of the circle. It also has a constructor and a pair of accessors and manipulators. These are set up in terms of radius rather than diameter -- to show you how using the accessor/manipulator paradigm combined with private fields allows you to separate the public interface of your class (everything expressed in terms of radius) with the internal implementation (expressed in terms of diameter). There are times when this can be extremely useful.
Here are the three starter files:
Graphics in Java
One of the AWT classes that we will need to work closely with is called Graphics. This is a software representation of a drawable region (i.e., the interior of a window). By calling methods of class Graphics, you can cause things to appear in the window. For example, you can draw lines, ovals, rectangles, text, etc. The area within the window is conceptualized as a 2D plane with origin at the upper left corner and an inverted y-axis (so down is positive). The program draws in the window sequentially, so the most recently drawn elements may cover up previously drawn ones. This will generally happen instantaneously, so that you will only see the final result.
Like JComponent, class Graphics is part of the package of Java classes called the Abstract Window Toolkit (AWT). You can look at the official Javadoc for Graphics to get an idea of what sorts of things you can do with it. We'll be learning more about other classes in the AWT soon.
TODO
These steps correspond to the TODO list in CircleApp.java.
- Create a new JCircle of any size (50 might be good to start) and
display it using putInWindow. Run the program to make sure it
shows up on your screen.
- Create a new JColorCircle of any size and color (for example:
Color.BLUE). See the Javadoc for Color for more information. Then
change the radius and color of your circle using the setRadius and
setColor methods. Does it make a difference whether you do this
before or after adding it to the window? How come?
- Create another JColorCircle using a custom RGB color. You can
use the RGB
Color Picker here to define your own color. Refer back to the
Color Javadoc for more information.
-
Create your own new class called JBorderCircle as a subclass of JColorCircle. This will be a colored circle with a border of a different color around the outside. You will have to give it a new field (call it border) to store the color of the border, and then create an appropriate constructor, accessor, and manipulator. Then you should override the paintComponent method to add the border. (Does the order matter here?)
Modify CircleApp.java to add at least one JBorderCircle window.
-
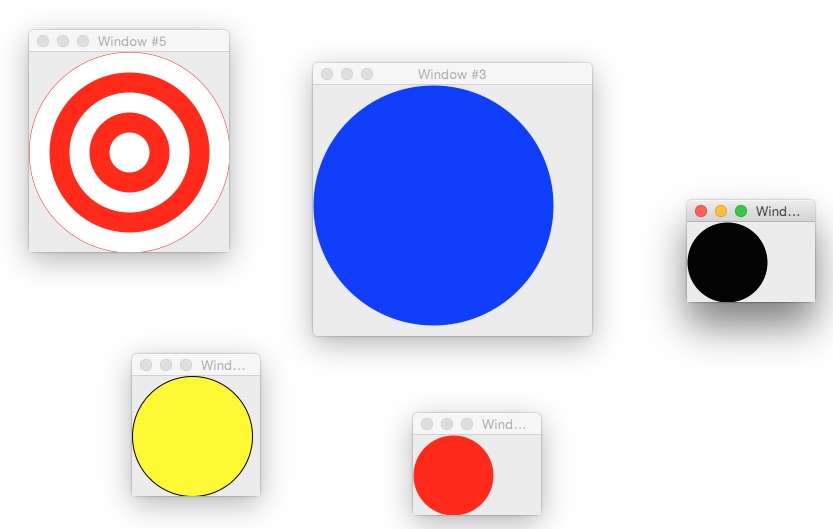
If you have time, create a JBullsEye class that
inherits from one of the other classes in the lab. It might take
two colors like the red and white one below, or it could take
more. Display an example of your class and demonstrate
manipulating the object's fields.
Screenshot
You should take a screenshot (named screenshot.png) of your assembled
set of windows once you are finished. Here is an example:
To turn in
Please submit the following files as lab2:
- All your .java files (including the ones you didn't modify) so that I can compile everything
- Your screenshot file, named screenshot.png
- no typescript is necessary this time
If you have more time, you may begin work on Homework 2.