CSC 103: How Computers Work
Lab 4: Processing
Credit for this lab: Dominique Thiebaut
Summary
In this lab we'll explore a high-level visual language called Processing. For the part on Monday you'll work with a randomly assigned partner.Getting Started
First, make sure you have Processing downloaded on one computer. There are instructions on the "Download" tab on the left (you do not need to donate anything). There is also a Reference page of all the commands, that might be useful to keep open.
Part 1: Monday
To make sure everything is working, copy the following code into the IDE (Integrated Development Environment):
void setup() {
  size(480, 480);
  smooth();
}

void draw() {
  rect(mouseX, mouseY, 80, 80);
}
Then click the "Run" button on the top left. Move the mouse around the
resulting window - what happens?
TODO
- First, change the "rect" (rectangle) to "ellipse" and see what
happens. Practice looking up this
command on the reference page.
- Now add the following line right before the ellipse line:
background(200);
This will color the background light gray (0 for black and 255 for white). Look up the "background" function in the reference manual and explain creates the results you see. - Next we will change the color of the circle with the "fill"
function. Look up this function and choose an RGB color here:
RGB Colors Add the "fill" function call after the background call but before the "ellipse" call. For example:
fill(255, 200, 8);
- Finally, experiment with printing out the mouse coordinates
(this can be useful for debugging):
text("(" + mouseX + " " + mouseY + ")", mouseX, mouseY);First comment out the "ellipse" line and set the fill to a different color (this is what the text color will be). Then add the line above to your draw function. Test it out and make sure it makes sense.
Part 2: Wednesday
Set up most of what we had on Monday (you can copy and paste the first example, then change it to circles, this is a good place to start). It might be good to bring up the documentation page and the RGB color page as well.
-
Now let's change the color of the circles being drawn by our last
sketch so that the circles are red when they
appear in the left side of the window, and orange when they appear in the right side of the
window (or you can choose your own two colors).
This is done by using and if statement, with its else counterpart. The
pseudo-code for doing this reads as follows:
if ( mouseX is in the left half ) {
    set the color of the circle to red
}
else {
    set the color of the circle to orange
}
Create the true code in your "draw" method and test it out! What happens if you replace mouseX with mouseY in the if statement? -
Processing uses a predefined boolean variable, i.e. a variable that contains either true or false to indicate whether the user is currently pressing the left mouse button or not.
We can test for this condition easily:
if ( mousePressed == true ) {
    put code here to be executed if the button is pressed
}
else {
    put code here to be executed if the button is not pressed
}
Use this code structure to change the color of the circle depending on whether the mouse is pressed (and held down, as opposed to clicked). This should result in one of your colors when the mouse is pressed and another when the mouse is not. - Make the program switch between a circle (of one color) and a
rectangle (of another color) as the user presses the mouse
button. For example, the program will display a circle if the
mouse is not pressed, and will display a rectangle if the mouse is
pressed.
- Previous mouse position: Processing keeps track of where the
mouse currently is by its mouseX, and mouseY coordinates, but also
where it was the last time the function draw() was called, and
this old position is kept by Processing in two variables called
pmouseX and pmouseY.
We can use this feature to draw lines between the successive positions of the mouse. Look up the "line" method and use mouseX, mouseY, pmouseX, and pmouseY as arguments. Comment out the code within your "draw" method and add this method call inside your draw function. Now you can actually draw in Processing!
Modify the program so that it only draws when the mouse is pressed.
-
Study the sketch below taken from openprocessing.org, and then run it.
void setup() {
  size( 400, 400 );
  smooth();
}

void draw() {

  background(200);

  // count from 20 to 380 jumping 20 each time.
  for( int x = 20; x < 400; x = x + 20 ) {

    // and draw a circle in that position, on a horizontal line.
    ellipse( x, 200, 15,15 );

  }
}
Modify your sketch so that it displays the circles vertically, as shown below (you can add a "fill" call to change the color):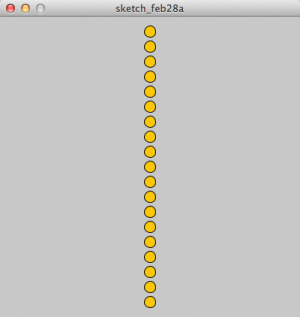
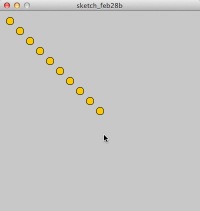
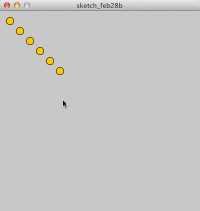
- Make the mouse control how many circles are displayed, so that no
circles can be shown on the right-hand side of the mouse, as
illustrated below. As the mouse moves to the right, more circles are
shown. As the mouse moves to the left, fewer.
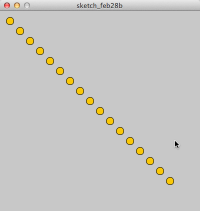
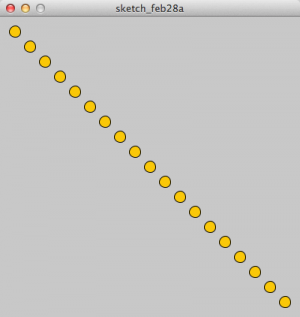
- Try to create a sketch whose behavior is similar to what
is displayed in the image below. Your sketch should have the following
properties:
- It is based on the same sketch you have been working with
- If the center of a circle is to the right of the mouse, the
circle is not displayed
- The circles have radii that increase as they get lower in the
window
- The color of the circles changes with each circle

- It is based on the same sketch you have been working with