CSC 240: Computer Graphics
Homework 5: Curves
Due: Monday, Oct. 24, 11:59pm on Moodle
1) Introduction
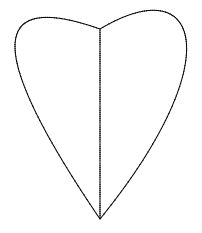
Download hw5.html. Only draw() is implemented right now. Inside draw() are several control points and 3 calls to Bézier functions. Once you have implemented these functions, you should see an image like the Bézier heart below:
2) Bézier Line
First, implement a function called bezierLineHelper, which will take in a time t between 0 and 1 (inclusive), two control points, and return the point on the Bézier line between p0 and p1. Use the equations for x and y that we discussed in class on Wednesday.
function bezierLineHelper(t, p0, p1) {...}
Now implement a function called bezierLine, which will call bezierLineHelper in a loop to create and draw the full line.
function bezierLine(p0, p1) {...}
It may be helpful to create a variable numPoints (either global or local is fine), which will be the number of points on our line. In between each of these points, we will draw a line (using the built-in line drawing method), similar to how we drew the regular polygons:
graphics.beginPath();
graphics.moveTo(first_x, first_y);
graphics.lineTo(next_x, next_y);
graphics.stroke();
Comment out the curves in the draw() method and test out your line method.
3) Quadratic Bézier Curve
Now implement a function called bezierQuadHelper, which should return the point ([x,y]) corresponding to t on a quadratic Bézier curve with 3 control points, using ONLY calls to bezierLineHelper.
function bezierQuadHelper(t, p0, p1, p2) {...}
Implement the corresponding function bezierQuad, which will call bezierQuadHelper in a loop to create and draw the full curve. Between each point on the curve, we will draw a LINE, using the built-in line method. Even though the curve is made up of many line segments, it still looks like a curve. You can experiment with how many points are needed to create a realistic curve (which will depend on the length of the curve).
function bezierQuad(p0, p1, p2) {...}
Uncomment the quadratic Bézier curve call and test out your method.
4) Cubic Bézier Curve
Finally, implement a function called bezierCubicHelper, which should return the point corresponding to t on a cubic Bezier curve with 4 control points, using a combination of calls to bezierLineHelper and bezierQuadHelper.
function bezierCubicHelper(t, p0, p1, p2, p3) {...}
Then implement the corresponding function bezierCubic, which will call bezierCubicHelper in a loop to create and draw the full curve.
function bezierCubic(p0, p1, p2, p3) {...}
5) Your name in Bézier curves
To practice Bézier curves and how the control points affect them, use your Bézier curve functions to write your name in Bézier curves. If your name is very long, you can abbreviate it or use your initials, as long as you create at least 3 letters using a combination of Bézier lines, quadratic Bézier curves, and cubic Bézier curves. Before starting this part, read the extension options below, since this may affect how you write your name. Also consider changing the line width:
graphics.lineWidth=3;
6) Extensions
Please choose one extension below.
- Filling arbitrary shapes. Right now, we are only drawing narrow lines, but it would be ideal to create letters that have varying width and can be "filled in". To do this, we will need to move beginPath(), moveTo(), and stroke() outside of each curve method, so that each letter is a continuous connection of points, which could include multiple Bézier curves. Here is a code outline of one way to do this:
  function letterA() {
    graphics.beginPath();
    graphics.moveTo(...);
    bezierCurve(....);
    bezierCurve(....);
    ....
    bezierCurve(....);
    graphics.closePath();
    graphics.stroke(); // draw outline
    graphics.fill();   // fill shape
  }
Then you could have a function for each letter. Think about ways to fill letters that have "holes" in them (like A). - Writing animation. Create an animation that shows your letters being "written" over time. One suggestion is to make a list of all the points on each Bézier curve, and then use setInterval to call a function that loops through these points.
- Bézier curve analysis. Almost all curves in graphics are done using Bézier curves. Even circles are not true circles, but 4 Bézier curves put together! For the extension, devise a way of quantifying how close 4 Bézier curves are to a circle. Think about using cos(t) and sin(t) as parametric functions for the unit circle. Then decide whether to use quadratic or cubic Bézier curves, and how to determine what control points would achieve a result close to the unit circle. Finally, integrate the different between the circle and your set of Bézier curves to find out how "off" the Bézier curve representation is. EXTRA CREDIT for excellent analysis and/or showing your result in HTML canvas. You can do this part on paper and submit a PDF (submit a separate html file if you also show this visually).
- Automating derivative matching (open ended). When using a series of Bézier curves to create a shape, it is typical to want the derivatives to match at the junction of two Bézier curves. Devise a way to automate this process. So if I have the control points for a given Bézier curve, and wanted to add another one to it, how could I automatically determine what the control points should be so that the derivatives match? If you do this option, describe what you did as a comment at the top of your code.
Submit
Submit your html file and a screenshot of your name. If you are doing the third extension, submit your work as a PDF file. If you are doing the last extension, include a comment at the top of your code describing what you did.
Collaboration:
For this assignment, you are welcome to work together, but everyone should turn in their own work that they have written and understood. Please cite anyone you worked with (and any TAs) as a comment at the top of your assignment.